2021年7月30日 星期五

Line Bot 上的 FlexMessage 用法

學習目標:
  • 了解 Line Bot 上的 FlexMessage 用法!
  • 設定 FlexMessage 連結 Line Bot 機器人資料庫!

產生 FlexMessage 程式碼
  1. 登入 Line Developers ,查看 Flex Message Simulator
  2. 利用「Showcase」選擇自己想要的範例!利用「View as JSON」可以查看檔案內容!
  3. 新增 app/flexmodules 子目錄,方便存放Flex Message 程式!
  4. 利用 Python 程式,產生所需要的 JSON 檔案格式,傳送給 Line 平台!例:flexmessages.py
    def fleximage(url):
        return { "type": "image",
                 "url": url,
                 "size": "full",
                 "aspectRatio": "20:13",
                 "aspectMode": "cover"}
                 
    def flextext(text,size,color,weight='regular',wrap=False):
        return { "type": "text",
                 "text": text,
                 "size": size,
                 "color": color,
                 "weight": weight,
                 "wrap": wrap }
                 
    def flexlogo(text='大學麵店'):
        return flextext(text, size='md',color='#066BAF', weight='bold')
    
    def flextitle(text):
        return flextext(text, size='xl',color='#066BAF', weight='bold')
        
    def flexhead(text):
        return flextext(text, size='xl',color='#555555')
        
    def flexnote(text):
        return flextext(text, size='md',color='#AAAAAA', wrap=True)
        
    def flexseparator(margin='xl'):
        return { "type": "separator", "margin": margin }
        
    def flexbutton(label, data, display_text):
        return { "type": "button",
                 "action": {
                     "type": "postback",
                     "label": label,
                     "data": data,
                     "display_text": display_text },
                     "style": "link",
                     "color": "#066BAF",
                     "height": "sm" }
                     
    def flex_index():
        hero_url = "https://scdn.line-apps.com/n/channel_devcenter/img/fx/01_2_restaurant.png"
        bodys = [flexlogo(),
        		 flextitle('歡迎光臨'),
                 flexseparator(),
                 flexhead('菜單列表'),
                 flexnote('# 查詢所有資料'),
                 flexseparator()]
        footers = [flexbutton('菜單列表','菜單','菜單列表'),
                   flexbutton('單項查詢','單項','單項菜單查詢') ]
    
        FlexMessage = {'type': 'bubble',
                        'hero': fleximage(hero_url),
                        'body': {
                            'type': 'box',
                            'layout': 'vertical',
                            'spacing': 'md',
                            'contents': bodys},
                        'footer': {
                            'type': 'box',
                            'layout': 'vertical',
                            'contents': footers}}
        return FlexMessage
    
  5. 新增程式 app/flexmodules/flextalks.py ,回應 line bot 平台的訊息!
    from app.flexmodules import flexmessages
    from linebot.models import FlexSendMessage
    from app import line_bot_api, handler
    
    def query_menu(event):
        if '菜單查詢' in event.message.text:
            line_bot_api.reply_message(
                event.reply_token,
                FlexSendMessage(alt_text='query record: index',contents=flexmessages.flex_index())
            )
            return True
        else:
            return False
    
  6. 修改 app/linebotmodules.py 裡的程式,加上呼叫 flextalks.py 的程式!
    (前面略過....)
            replay = False
    
            if not replay:
                reply = flextalks.query_menu(event)
    (後面略過....)
    
  7. 上傳至 Heroky 專案內!進行測試!
製作 PostbackEvent 程式碼
  1. 修改 app/linebotmodules.py 裡的程式!在最後一行加上下列程式碼:
    (前面略過....)
    # line 回應的訊息
    @handler.add(PostbackEvent)
    def handle_postback(event):
        print(event)
        flextalks.query_menu_back(event)
    
  2. 修改程式 app/flexmodules/flextalks.py ,import 資料庫連結程式,並加入回應 line bot 平台的訊息!
    (前面略過....)
    from app import line_bot_api, handler
    from app.dataSQL import connectDB
    (中間略過....)
    def query_menu_back(event):
        query = event.postback.data
        print(query)
        if '=' in query:
            print(query.split('=')[1])
            data = connectDB.queryItem(query.split('=')[1])
            menu_name = [i[2] for i in data]
            line_bot_api.reply_message(
                event.reply_token,
                FlexSendMessage(
                    alt_text=f"query record: column {query}",
                    contents= flexmessages.flex_menu_prize(query,menu_name)
                )
            )
            return True
        elif '菜單' in query:
            data = connectDB.showallMenu()
            menu_name = [i[1] for i in data]
            line_bot_api.reply_message(
                event.reply_token,
                FlexSendMessage(
                    alt_text=f"query record: column {query}",
                    contents= flexmessages.flex_menu(query,menu_name)
                )
            )
            return True
        else:
            return False
    
  3. 修改程式 app/flexmodules/fflexmessages.py,在檔案最後面,加上下列程式:
    (前面略過....)
    def flex_menu(keywords, data):
        bodys = [flexlogo(),
        		 flextitle(f'{keywords}'),
                 flexseparator()]
    
        footers = [flexbutton(f"{i}",f"{keywords}={i}",f"查詢 {i}") for i in data]
    
        FlexMessage = {'type': 'bubble',
                        'body': {
                            'type': 'box',
                            'layout': 'vertical',
                            'spacing': 'md',
                            'contents': bodys},
                        'footer': {
                            'type': 'box',
                            'layout': 'vertical',
                            'contents': footers}}
        return FlexMessage
    
    def flex_menu_prize(keywords, data):
        keyword = keywords.split('=')[1]
        bodys = [flexlogo(),
        		 flextitle(f'{keyword}'),
                 flexseparator(),
                 flexnote(f'價格:{data}'),
                 flexseparator()]
    
        footers = [flexbutton("菜單查詢","菜單查詢","菜單列表")]
    
        FlexMessage = {'type': 'bubble',
                        'body': {
                            'type': 'box',
                            'layout': 'vertical',
                            'spacing': 'md',
                            'contents': bodys},
                        'footer': {
                            'type': 'box',
                            'layout': 'vertical',
                            'contents': footers}}
        return FlexMessage
    
  4. 修改 app/dataSQL/connectDB.py,加入單項查詢的資料庫語法:
    (前面略過....)
    def queryItem(keyword):
        DATABASE_URL = os.environ['DATABASE_URL']
        connection_db = psycopg2.connect(DATABASE_URL,sslmode='require')
        cursor = connection_db.cursor()
        SQL_cmd = f"""SELECT * FROM menu WHERE menuname = %s;"""
        cursor.execute(SQL_cmd,[keyword])
        connection_db.commit()
        raws = cursor.fetchall()
        data = []
        for raw in raws:
            data.append(raw)
        
        cursor.close()
        connection_db.close()
        return data
    (後面略過....)
    
  5. 上傳 Heroku 專案後,進行測試!

2021年7月24日 星期六

連結與使用資料庫

學習目標:
  • 了解 Python 與資料庫連結方式!
  • 設定 Line Bot 機器人讀寫資料庫!

Python 與資料庫連結
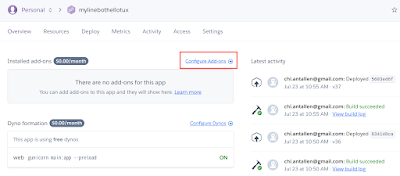
  1. 在 Heroku 上,新增一個資料庫軟體:
    • 使用「Configure Add-ons」選項!
    • 選擇「Heroku Postgres」項目!
    • 「Plan Name」選用 Free 項目!再按下「Submit Order Form」!
    • 按下「Heroku Postgres」可查看使用情形!
  2. 使用文字介面視窗,安裝 psycopg2 套件,並進行資料庫的建立!
    C:\workspace\LineBot> heroku login -i
    C:\workspace\LineBot> pip install psycopg2
    C:\workspace\LineBot> python
    >>> import os
    >>> import psycopg2
    >>> heroku_pgCLI = 'heroku config:get DATABASE_URL -a 你的APP名稱'
    >>> DATABASE_URL = os.popen(heroku_pgCLI).read()[:-1]
    >>> print(DATABASE_URL)
    >>> connection_db=psycopg2.connect(DATABASE_URL, sslmode='require')
    >>> cursor = connection_db.cursor()
    >>>
    (要注意一下網址!)
    
  3. 建立一張表格,可以放入麵店的點餐單資料!
    >>> SQL_cmd = '''CREATE TABLE menu(
    ... menu_id serial PRIMARY KEY,
    ... menuname VARCHAR (150) UNIQUE NOT NULL,
    ... menuprize Integer NOT NULL
    ... );'''
    >>> cursor.execute(SQL_cmd)
    >>> connection_db.commit()
    >>> cursor.close()
    >>> connection_db.close()
    >>>
    
  4. 查看一下 Heroku 內的資料!
  5. 利用指令,查看資料庫表格相關訊息!
    >>> import os
    >>> import psycopg2
    >>> heroku_pgCLI = 'heroku config:get DATABASE_URL -a 你的APP名稱'
    >>> DATABASE_URL = os.popen(heroku_pgCLI).read()[:-1]
    >>> connection_db=psycopg2.connect(DATABASE_URL, sslmode='require')
    >>> cursor = connection_db.cursor()
    >>> SQL_cmd = '''SELECT column_name, data_type FROM information_schema.columns WHERE table_name = 'menu';'''
    >>> cursor.execute(SQL_cmd)
    >>> connection_db.commit()
    >>> data = []
    >>> while True:
    ...   temp = cursor.fetchone()
    ...   if temp:
    ...      data.append(temp)
    ...   else:
    ...      break
    ... 
    >>> print(data)
    [('menu_id', 'integer'), ('menuname', 'character varying'), ('menuprize', 'integer')]
    >>> cursor.close()
    >>> connection_db.close()
    
    PS:刪除資料的方式:SQL_cmd = '''DROP TABLE IF EXISTS menu;''' ,再重複執行上列工作即可!
  6. 將一筆資料輸入資料表內!
    >>> import os
    >>> import psycopg2
    >>> heroku_pgCLI = 'heroku config:get DATABASE_URL -a 你的APP名稱'
    >>> DATABASE_URL = os.popen(heroku_pgCLI).read()[:-1]
    >>> connection_db=psycopg2.connect(DATABASE_URL, sslmode='require')
    >>> cursor = connection_db.cursor()
    >>> record = ('牛肉麵',170)
    >>> table_columns = '(menuname,menuprize)'
    >>> SQL_cmd = f"""INSERT INTO menu {table_columns} VALUES(%s,%s);"""
    >>> cursor.execute(SQL_cmd,record)
    >>> connection_db.commit()
    >>> cursor.close()
    >>> connection_db.close()
    
  7. 將多筆資料輸入資料表內!
    >>> import os
    >>> import psycopg2
    >>> heroku_pgCLI = 'heroku config:get DATABASE_URL -a 你的APP名稱'
    >>> DATABASE_URL = os.popen(heroku_pgCLI).read()[:-1]
    >>> connection_db=psycopg2.connect(DATABASE_URL, sslmode='require')
    >>> cursor = connection_db.cursor()
    >>> record = [('餛飩麵',100),('湯麵',80)]
    >>> table_columns = '(menuname,menuprize)'
    >>> SQL_cmd = f"""INSERT INTO menu {table_columns} VALUES(%s,%s);"""
    >>> cursor.executemany(SQL_cmd,record)
    >>> connection_db.commit()
    >>> count = cursor.rowcount
    >>> print(count," records have inserted!!")
    >>> cursor.close()
    >>> connection_db.close()
    
  8. 列出資料庫的資料表內容
    >>> import os
    >>> import psycopg2
    >>> heroku_pgCLI = 'heroku config:get DATABASE_URL -a 你的APP名稱'
    >>> DATABASE_URL = os.popen(heroku_pgCLI).read()[:-1]
    >>> connection_db=psycopg2.connect(DATABASE_URL, sslmode='require')
    >>> cursor = connection_db.cursor()
    >>> SQL_cmd = f"""SELECT * FROM menu ;"""
    >>> cursor.execute(SQL_cmd)
    >>> connection_db.commit()
    >>> temp = cursor.fetchall()
    >>> print(temp)
    >>> count = cursor.rowcount
    >>> print(count," records have geted!!")
    >>> cursor.close()
    >>> connection_db.close()
    
  9. 有條件的列出資料庫的資料表內容:
    >>> import os
    >>> import psycopg2
    >>> heroku_pgCLI = 'heroku config:get DATABASE_URL -a 你的APP名稱'
    >>> DATABASE_URL = os.popen(heroku_pgCLI).read()[:-1]
    >>> connection_db=psycopg2.connect(DATABASE_URL, sslmode='require')
    >>> cursor = connection_db.cursor()
    >>> prize = 100
    >>> SQL_cmd = f"""SELECT * FROM menu WHERE menuprize < %s;"""
    >>> cursor.execute(SQL_cmd,[prize])
    >>> connection_db.commit()
    >>> temp = cursor.fetchall()
    >>> print(temp)
    >>> count = cursor.rowcount
    >>> print(count," records have geted!!")
    >>> cursor.close()
    >>> connection_db.close()
    
  10. 更新資料庫的資料表內容:
    >>> import os
    >>> import psycopg2
    >>> heroku_pgCLI = 'heroku config:get DATABASE_URL -a 你的APP名稱'
    >>> DATABASE_URL = os.popen(heroku_pgCLI).read()[:-1]
    >>> connection_db=psycopg2.connect(DATABASE_URL, sslmode='require')
    >>> cursor = connection_db.cursor()
    >>> name = "湯麵"
    >>> prize = 50
    >>> SQL_cmd = f"""UPDATE menu SET menuprize = %s WHERE menuname = %s;"""
    >>> cursor.execute(SQL_cmd,(prize,name))
    >>> connection_db.commit()
    >>> count = cursor.rowcount
    >>> print(count," records have updated!!")
    >>> cursor.close()
    >>> connection_db.close()
    
  11. 刪除資料庫內的資料表內容:"DELETE FROM menu WHERE menuname = '';"
Python 與資料庫連結
  1. 修改 LineBot 專案的 requirements.txt:
    Flask>=1.1.1
    gunicorn>=20.0.4
    line-bot-sdk>=1.15.0
    APScheduler>=3.6.1
    psycopg2>=2.0.0
    
  2. 修改 LineBot 專案的程式碼:app/linebotmodules.py
    import app.dataSQL import callData
    (中間略過....)
    # 靈活展現文字
    @handler.add(MessageEvent, message=TextMessage)
    def replyText(event):
        if event.source.user_id == "Uf4a596a6eb65eabf52c003ffe325a21d":
           reply = False
           if not reply:
               reply = callData.showData(event)
    (接下來的程式碼,請先註解....)
    
  3. 在 app 資料夾新增 dataSQL 資料夾!
  4. 在資料夾 dataSQL 中,新增檔案 connectDB.py:
    import os
    import psycopg2
    
    def showallMenu():
        DATABASE_URL = os.environ['DATABASE_URL']
        connection_db = psycopg2.connect(DATABASE_URL,sslmode='require')
        cursor = connection_db.cursor()
        SQL_cmd = f"""SELECT * FROM menu ;"""
        cursor.execute(SQL_cmd)
        raws = cursor.fetchall()
        data = []
        for raw in raws:
            data.append(raw)
    
        return data
    
  5. 在資料夾 dataSQL 中,新增檔案 callData.py:
    from app import line_bot_api
    from linebot.models import TextSendMessage, ImageSendMessage, TemplateSendMessage, messages
    from linebot.models import ImageCarouselTemplate, ImageCarouselColumn, URIAction
    from app.dataSQL import connectDB
    
    import random
    
    def showData(event):
        if '菜單' in event.message.text:
            data = connectDB.showallMenu()
            print_text = ""
            for i in data:
                print_text += str(i[1])
                print_text += str(i[2])
                print_text += "\n"
    
            line_bot_api.reply_message(
                event.reply_token,
                TextSendMessage(text=print_text)
            )
    
            return True
        else:
            return False
    

2021年7月22日 星期四

機器人主動推送通知

學習目標:
  • 在 Flask 上,寫一個網頁,防止 Heroku 主機休眠!
  • 寫一個定時推送通知的 Line Bot 機器人程式!

寫個簡易的 Flask 小網頁
  1. 修改 app/router.py 的內容
    (前方省略....)
    from flask import render_template
    
    # 設定預設網頁
    @app.route("/")
    def home():
        return render_template("home.html")
    (後方省略....)
    
  2. 在專案目錄 LineBot 下,建立 app/templates/home.html 的 HTML 檔案:
    <!DOCTYPE html>
    <html lang="en">
    <head>
    <title>MyLineBot</title>
    </head>
    <body>
    <h1>Hello, World</h1>
    </body>
    </html>
  3. 將專案推向 Heroku 主機....
  4. 打開瀏覽器,輸入http://你的專案.herokuapp.com/

定時推送通知的機器人程式
  1. 安裝 APScheduler
    C:\> pip install APScheduler
    
  2. 在專案目錄中,寫一個 timer.py 的時鐘程式
    from apscheduler.schedulers.blocking import BlockingScheduler
    import urllib.request
    
    scheduleEvent = BlockingScheduler()
    
    @scheduleEvent.scheduled_job('cron',day_of_week='mon-fri',minute='*/20')
    def scheduled_job():
        website = "https://mylinebothellotux.herokuapp.com/"
        connection = urllib.request.urlopen(website)
    
        for i, value in connection.getheaders():
            print(i,value)
    
    scheduleEvent.start()
    
  3. 修改 Procfile 檔案內容
    web: gunicorn main:app --preload
    clock: python timer.py
    
  4. 修改 requirements.txt 檔案內容
    Flask>=1.1.1
    gunicorn>=20.0.4
    line-bot-sdk>=1.15.0
    APScheduler>=3.6.1
    
  5. 上傳專案到 heroku
  6. 修改 Heroku 的設定值
  7. 建立主動推送通知的方式:
    line_bot_api.push_message(to, TextSendMessage(text='Morning Sir'))
    
  8. 修改成需要的樣子:linebotmodules.py
     (前方省略....)
     except:
              #hello_text = echo(event.message.text)
              line_bot_api.push_message(
                '你的 User ID',
                TextSendMessage(text='沒找到')
              )
    
  9. 推送上 Heroku !
  10. 在手機 line 上,輸入任何一個句子!

2021年7月20日 星期二

到網路上爬圖片吧!

學習目標:
  • 寫出網路爬蟲程式,將 Google 上的圖檔回傳!

寫出網路爬蟲程式
  1. 開啟瀏覽器,利用 Google 進行查詢!按下「F12」進行網址的觀察!
  2. 在 python 文字介面中,進行分析與測試:
    C:\workspace\LineBot> python
    >>>
    
  3. 導入 urllib ,對 google 進行網站的連結:
    >>> import urllib.request
    >>> url = "https://www.google.com/"
    >>> conn = urllib.request.urlopen(url)
    >>> print(conn)
    <http.client.HTTPResponse object at 0x7f0d76035550>
    
  4. 將接收的物件,轉成資料印出來:
    >>> data = conn.read()
    >>> print(data)
    (印出的資料太多了,省略一下...)
    
  5. 修正一下,將 headers 的參數加上,限制資料印出的數量:
    >>> header = { 'User-Agent': 'Mozilla/5.0 (X11; Linux x86_64; rv:78.0) Gecko/20100101 Firefox/78.0' }
    >>> req = urllib.request.Request(url,headers=header)
    >>> conn = urllib.request.urlopen(req)
    >>> data = conn.read()
    >>> print(data)
    (印出的資料太多了,省略一下...)
    
    PS: 你有個網頁好幫手「F12」!
  6. 回瀏覽器,在 google 查詢一下某家書商的名稱,再切換成圖片,觀察一下網址變化
    PS: 注意其網址的組成!
  7. 上圖中,按下滑鼠右鍵,可以「複製網址」
  8. 將網址複製後,貼至 python 的文字介面視窗內,進行分析!
    PS:觀察之後,可以猜測:
    • q=%E5%8D%9A%E7%A2%A9: 代表查詢字串
    • tbm=isch :指的是查詢圖片
  9. 使用分析函式,進行相關網址分析:
    >>> u = urllib.request.urlparse(search_url)
    >>> print(u)
    
  10. 進行下一步的分析!
    >>> u[4]
    >>> urllib.parse.parse_qs(u[4])
    
  11. URL 分析列表,有助於組合回原來的查詢字串:
     Attribute   Index   Value   Value if not present 
    scheme 0 URL scheme specifier scheme parameter
    netloc 1 Network location part empty string
    path 2 Hierarchical path empty string
    params 3 Parameters for last path element empty string
    query 4 Query component empty string
    fragment 5 Fragment identifier empty string
    username User name None
    password Password None
    hostname Host name (lower case) None
    port Port number as integer,if present None
  12. 大致上了解其組成結構後,可以進行測試:
    >>> test = {'tbm': 'isch', 'q': '博碩'}
    >>> urllib.parse.urlencode(test)
    'tbm=isch&q=%E5%8D%9A%E7%A2%A9'
    
  13. 將下列字串,放回瀏覽器的網址列,觀查結果是否相同:
    https://www.google.com/search?tbm=isch&q=%E5%8D%9A%E7%A2%A9
    
  14. 回到文字介面中,持續進行測試:
    >>> url = f"https://www.google.com/search?{urllib.parse.urlencode(test)}/"
    >>> req = urllib.request.Request(url, headers=header)
    >>> conn = urllib.request.urlopen(req)
    >>> data = conn.read()
    >>> print(data)
    (資料出現太多,省略過去....)
    
  15. 從瀏覽器中,分析圖片位於 HTML 語法中的何處!提示:在「檢視原始碼中」,查詢關鍵字詞:"img data-src"
  16. 切回文字介面,設定關鍵字詞的樣板:正規化設定
    >>> import re
    >>> template = '"(https://encrypted-tbn0.gstatic.com[\S]*)"'
    >>> image_list = []
    >>> for i in re.finditer(template,str(data,'utf-8')):
    ...     image_list.append(i.group(1))
    >>> image_list[:5]
    
    PS: 語法注意事項
    • [\S]: 空白字元除外
    • * : 任意字數的字元
    • .group(1): 只頡取 template 字串中的有()號的內容資料
    • [:5] : 取回前五行資料!
  17. 整理下過的指令,可容易形成程式檔案:
    import urllib.request
    import re
    import random
    
    search_key_word = {'tbm': 'isch', 'q': event.message.text}
    url = f"https://www.google.com/search?{urllib.parse.urlencode(search_key_word)}/"
    header = { 'User-Agent': 'Mozilla/5.0 (X11; Linux x86_64; rv:78.0) Gecko/20100101 Firefox/78.0' }
    req = urllib.request.Request(url, headers=header)
    conn = urllib.request.urlopen(req)
    data = conn.read()
    template = '"(https://encrypted-tbn0.gstatic.com[\S]*)"'
    image_list = []
    for i in re.finditer(template,str(data,'utf-8')):
      image_list.append(i.group(1))
    
    random_image_url = image_list[random.randint(0, len(image_list)-1)]
    
    line_bot_api.reply_message(
      event.reply_token,
      ImageSendMessage(
        original_content_url=random_image_url,
        preview_image_url=random_image_url
      )
    )
    
  18. 利用 line-bot-sdk-python 提供的 TemplateSendMessage 可以一次取得多張圖片:
    TemplateSendMessage(
      alt_text=alt_text
      template=ImageCarouselTemplate(
        columns=[ImageCarouselColumn(
          image_url='https://website/image.jpg',
          action=URIAction(uri='https://website',label='label'))]
      )
    )
    
  19. 修改 LineBot/app/linebotmodules.py 檔案,將上面試過的指令,一一寫入檔案內!
    from linebot.models.send_messages import ImageSendMessage
    from app import line_bot_api, handler
    from linebot.models import MessageEvent, TextMessage, TextSendMessage
    
    import urllib.request
    import re
    import random
    
    # 查詢 google
    @handler.add(MessageEvent, message=TextMessage)
    def replyText(event):
        if event.source.user_id == "Uf4a596a6eb65eabf52c003ffe325a21d":
    
                search_key_word = {'tbm': 'isch', 'q': event.message.text}
                url = f"https://www.google.com/search?{urllib.parse.urlencode(search_key_word)}/"
                header = { 'User-Agent': 'Mozilla/5.0 (X11; Linux x86_64; rv:78.0) Gecko/20100101 Firefox/78.0' }
                req = urllib.request.Request(url, headers=header)
                conn = urllib.request.urlopen(req)
                data = conn.read()
                template = '"(https://encrypted-tbn0.gstatic.com[\S]*)"'
                image_list = []
                
                for i in re.finditer(template,str(data,'utf-8')):
                    image_list.append(re.sub(r'\\u003d','=',i.group(1)))
    
                random_image_url = image_list[random.randint(0, len(image_list)+1)]
    
                line_bot_api.reply_message(
                    event.reply_token,
                    ImageSendMessage(
                        original_content_url=random_image_url,
                        preview_image_url=random_image_url
                    )
                )
    
  20. 將程式推上 Heroku 主機,並且進行測試!
  21. 修改 LineBot/app/linebotmodules.py 檔案,加入 TemplateSendMessage 模組!
    from linebot.models.send_messages import ImageSendMessage
    from app import line_bot_api, handler
    from linebot.models import MessageEvent, TextMessage, TextSendMessage
    
    import urllib.request
    import re
    import random
    
    # 查詢 google
    @handler.add(MessageEvent, message=TextMessage)
    def replyText(event):
        if event.source.user_id == "Uf4a596a6eb65eabf52c003ffe325a21d":
                search_key_word = {'tbm': 'isch', 'q': event.message.text, 'client': 'img'}
                url = f"https://www.google.com/search?{urllib.parse.urlencode(search_key_word)}/"
                header = { 'User-Agent': 'Mozilla/5.0 (X11; Linux x86_64; rv:78.0) Gecko/20100101 Firefox/78.0' }
                req = urllib.request.Request(url, headers=header)
                conn = urllib.request.urlopen(req)
                data = conn.read()
                template = '"(https://encrypted-tbn0.gstatic.com[\S]*)"'
                image_list = []
                for i in re.finditer(template,str(data,'utf-8')):
                    image_list.append(re.sub(r'\\u003d','=',i.group(1)))
    
                #random_image_url = image_list[random.randint(0, len(image_list)-1)]
                random_image_list = random.sample(image_list,k=3)
    
                image_template = ImageCarouselTemplate(
                    columns=[ImageCarouselColumn(image_url=urx,action=URIAction(label=f'image{j}',
                    uri=urx)) for j,urx in enumerate(random_image_list)]
                )
    
                line_bot_api.reply_message(
                    event.reply_token,
                    TemplateSendMessage(
                        alt_text='Hello World',
                        template=image_template
                    )
                )
    
  22. PS: heroku 可能會當機,膽小者勿試!

重新設計應用程式

學習目標:
  • 將檔案分解,藏暱重要的 Line Bot 聊天機器人機密
  • 結構化開發的專案,以利將來的維護與發展

藏暱重要的機密
  1. 在專案資料夾 LineBot下,新增 config.ini 檔案,寫人重要資訊
    [LineBot]
    channel_access_token = Channel access token
    channel_secret = Channel secret
    
  2. 修改主要程式檔:main.py
    (前面略過...)
    import configparser
    
    app = Flask(__name__)
    
    # 導入 config.ini 檔案
    config = configparser.ConfigParser()
    config.read('config.ini')
    
    # Line 聊天機器人的基本資料
    line_bot_api = LineBotApi(config.get('LineBot','channel_access_token'))
    handler = WebhookHandler(config.get('LineBot','channel_secret'))
    (以下略過...)
    
  3. 將程式碼送上 Heroku 進行測試,應不會出現錯誤訊息
    C:\LineBot>git add .
    C:\LineBot>git commit -m "Modify Main.py"
    C:\LineBot>git push heroku main
    
  4. MessageEvent主要分類:
    • MessageEvent:訊息事件
      • TextMessage:文字訊息
      • ImageMessage:圖片訊息
      • VideoMessage:影音訊息
      • StickerMessage:貼圖訊息
      • FileMessage:檔案訊息
    • FollowEvent:加入好友事件
    • UnfollowEvent:刪除好友事件
    • JoinEvent:加入聊天室事件
    • LeaveEvent:離開聊天室事件
    • MemberJoinedEvent:加入群組事件
    • MemberLeftEvent:離開群組事件
  5. 試著加上一些程式碼,例:main.py
    (前面的程式略過....)
    # 鸚鵡學說話
    @handler.add(MessageEvent, message=TextMessage)
    def echo(event):
        # user id 在 Line Developers / Basic Setting 下
        if event.source.user_id == "Uf4a596a6eb65eabf52c003ffe325a21d":
            line_bot_api.reply_message(
                event.reply_token,
                TextSendMessage(text=event.message.text)
            )
    
    if __name__ == "__main__":
        app.run()
    
    PS:將程式推上 Heroku ,再測看看!
學會查看重要記錄檔
  1. 在 main.py 檔案中,寫入一小斷程式碼:
    (前面略過....)
    print(body)
    try:
    (後面略過....)
    
  2. 利用 Heroku 的 app dashboard ,可查看 Server 上運作的訊息:
關閉自動訊息的回應
  1. 如果不喜歡這個自動回應的訊息,可以關閉:
  2. 靈活的改一段程式,顯現想要回應的訊息:main.py
    (前面略過....)
    # 靈活展現文字
    @handler.add(MessageEvent, message=TextMessage)
    def echo(event):
        # user id 在 Line Developers / Basic Setting 下
        if event.source.user_id == "Uf4a596a6eb65eabf52c003ffe325a21d":
    
            display_message = '你後面那位也想聽'
    
            if event.message.text == "tux來一個鬼故事":
                response_message = display_message
    
            line_bot_api.reply_message(
                event.reply_token,
                TextSendMessage(text=response_message)
            )
    
    if __name__ == "__main__":
        app.run()
    (後面略過....)
    
結構化開發專案的目錄設計
  1. 將目錄結構化成下列形式,儘量把程式分門別類分開:
    LineBot
      |-- Procfile
      |-- requirements.txt
      |-- runtime.txt
      |-- config.ini
      |-- main.py
      |-- app
           |-- __init__.py
           |-- router.py
           |-- linebotmodules.py
    
  2. 修改 main.py ,將內容儘量清空:
    from app import app
    
    if __name__ == "__main__":
       app.run()
    
  3. 新增 __init__.py 內容:
    from flask import Flask, request, abort
    from linebot import LineBotApi, WebhookHandler
    import configparser
    
    app = Flask(__name__)
    
    # 導入 config.ini 檔案
    config = configparser.ConfigParser()
    config.read('config.ini')
    
    # Line 聊天機器人的基本資料
    line_bot_api = LineBotApi(config.get('LineBot','channel_access_token'))
    handler = WebhookHandler(config.get('LineBot','channel_secret'))
    
    # 導入其他的程式模組
    from app import router, linebotmodules
    
  4. 新增 router.py 內容:
    from app import app, handler, request, abort
    from linebot.exceptions import InvalidSignatureError
    
    # 接收 Line 平台來的「通知」
    @app.route("/callback", methods=['POST'])
    def callback():
        signature = request.headers['X-Line-Signature']
        body = request.get_data(as_text=True)
        app.logger.info("Request body: " + body)
    
        print(body)
        try:
            handler.handle(body, signature)
        except InvalidSignatureError:
            abort(400)
    
        return 'OK'
    
  5. 新增 linebotmodules.py 內容:
    from app import line_bot_api, handler
    from linebot.models import MessageEvent, TextMessage, TextSendMessage
    
    # 靈活展現文字
    @handler.add(MessageEvent, message=TextMessage)
    def echo(event):
        # user id 在 Line Developers / Basic Setting 下
        if event.source.user_id == "Uf4a596a6eb65eabf52c003ffe325a21d":
    
            display_message = '你後面那位也想聽'
    
            if event.message.text == "tux來一個鬼故事":
                response_message = display_message
    
            line_bot_api.reply_message(
                event.reply_token,
                TextSendMessage(text=response_message)
            )
    
    
  6. 將程式推上 Heroku ,再測看看!

2021年7月18日 星期日

初始化 LineBot 專案

學習目標:
  • 了解 Line Bot 聊天機器人專案所需使用的設定
  • 了解每項開發工具的配合項目與使用方式

開始建立 Line Bot 專案
  1. 在 Workspace 目錄下,建立一個新的專案資料夾:LineBot
  2. 在 LineBot 資料匣下,先行建立 Python 主要程式檔:main.py
    import os
    from flask import Flask, request, abort
    from linebot import LineBotApi, WebhookHandler
    from linebot.exceptions import InvalidSignatureError
    
    app = Flask(__name__)
    
    # Line 聊天機器人的基本資料
    line_bot_api = LineBotApi('Channel access token')
    handler = WebhookHandler('Channel secret')
    
    # 接收 line 平台送來的「通知」
    @app.route("/callback", methods=['POST'])
    def callback():
        signature = request.headers['X-Line-Signature']
        body = request.get_data(as_text=True)
        app.logger.info("Request body: " + body)
    
        try:
            handler.handle(body, signature)
        except InvalidSignatureError:
            abort(400)
    
        return 'OK'
    
    if __name__ == "__main__":
        app.run()
    
    PS:先別急著執行測試該檔案
  3. 到 Line Developers 申請 access token 以及 secret key:
    • 選擇 Basic setting
    • 下接網頁至底,可以看見 Channel secret 項目!將資料複製下來,貼至程式 main.py 中,取代 Channel secret 字樣!
    • 選擇 Messaging API :
    • 下接頁面至底,可以看到 Channel access token!按下 issue ,可以產生access token !!
      複製 token 後,取代程式 main.py 內的 Channel access token 字樣!
  4. 在 Heroku 中建立專案!
    • 登入 Heroku 首頁中,選擇「Create new app」
  5. 自行輸入專案名稱,只要是出現綠色框,表示 Heroku 同意建立!
  6. 建立的主畫面如下:
  7. 在主畫面往下拉,可看見 Heroku cli 的 git 教學
    PS:等一下將會使用到該教學
  8. 在專案目錄底下建立三個檔案,分別為 Procfile、requirements.txt、runtime.txt
    • Procfile 檔案內容
      web: gunicorn main:app --preload
      
    • requirements.txt
      Flask>=1.1.1
      gunicorn>=20.0.4
      line-bot-sdk>=1.15.0
      
    • runtime.txt
      python-3.9.6
      
  9. 將工作目錄切換至專案目錄內,將檔案推送至 Heroku 的專案內!
    heroku login
    git init
    heroku git:remote -a 你的app名稱
    git add .
    git commit -m "Add new App"
    git branch
    git checkout -b main
    git branch -D master
    git push heroku main
     
    PS:出現以下畫面,就算成功了!
  10. 設定 Line Developers 的 Webhook :
    • 在 Line Developers 的 Messaging API 中,下拉網頁至 Webhook site
    • 在 Webhook URL 的欄位中,輸入 https://你的app名稱.herokuapp.com/callback
    • 按下「Verify」可以驗證結果,並且要記得推開 Use webhook 的功能
  11. 修改 main.py 檔案後,推送至 Heroku 專案,即可進行測試
    import os
    from typing import Text
    from flask import Flask, request, abort
    from linebot import LineBotApi, WebhookHandler
    from linebot.exceptions import InvalidSignatureError
    
    from linebot.models import MessageEvent, TextMessage, TextSendMessage
    
    app = Flask(__name__)
    
    # Line 聊天機器人的基本資料
    line_bot_api = LineBotApi('Channel access token')
    handler = WebhookHandler('Channel secret')
    
    # 接收 line 平台送來的「通知」
    @app.route("/callback", methods=['POST'])
    def callback():
        signature = request.headers['X-Line-Signature']
        body = request.get_data(as_text=True)
        app.logger.info("Request body: " + body)
    
        try:
            handler.handle(body, signature)
        except InvalidSignatureError:
            abort(400)
    
        return 'OK'
    
    if __name__ == "__main__":
        app.run()
    
參考文獻:

2021年7月17日 星期六

了解 Line Bot 聊天機器人

學習目標:
  • 了解 Line Bot 聊天機器人的架構
  • 註冊 Line Developers 帳號
  • 註冊雲端免費的平台 Heroku
  • 設定 VSCode 連結 Heroku 專案

Line Bot 聊天機器人運作流程
  1. LINE Bot主要的執行架構:
    PS:圖片來源:[Python+LINE Bot教學]6步驟快速上手LINE Bot機器人
  2. Line Bot 主要執行架構中,共有三個角色:
    • 使用者
    • Line 平台
    • 聊天機器人:也就是運作中的 Server
  3. 開發本程式之前,要做的事:
    • 註冊 Line Developers
    • 運作中的 Server: 使用雲端免費的平台 Heroku
Line Bot 註冊流程
  1. 開啟 Line Developers 官網網頁:https://developers.line.biz/zh-hant/
  2. 按右上角的 Log In
  3. 選擇「使用LINE帳號登入」
  4. 輸入姓名及電子郵件
  5. 網頁向下拉一點,點擊「Create a new provider」
  6. 紅框中,可輸入自己名字、公司名稱!再按下「Create」
  7. 選擇「Create a Messaging API channel」
  8. 接下來,重要的輸入:
    • 填入Channel name (未來可修改)!
    • 填入 Channel description (未來可修改)!
    • 填入 Category (不可修改)!
    • 填入 Subcategory (不可修改)
  9. 勾選最後兩項資料後,即可「Create」
  10. 建好之後的畫面如下:
Heroku 註冊流程
  1. 開啟 Heroku 官網:https://www.heroku.com/
  2. 按下右上角的「Sign Up」進入註冊流程
  3. 註冊時,請注意要選擇正確的開發語言:
    填入的信箱,也是要馬上可以收到信件的正確信箱位址
  4. 到自己的信件中,確認回函!
  5. 新建密碼:注意要求的規則!
  6. 觀迎光臨!
  7. 同意合規性!
  8. Hekoru 主畫面!
安裝 Heroku CLI 程式
  1. 登入 Heroku 主畫面後,按下下方的「Support」按鍵!
  2. 選擇「Installing and updating the ......」這個項目!
  3. 選擇「Download and Install」項目!
  4. 選擇合適的安裝項目!進行後續安裝!
  5. 安裝完成後,執行「heroku -v」指令,測試是否安裝完成!
設定 VSCode 連結 Heroku 專案
  1. 開啟 VSCode ,選擇安裝 Heroku 工具!
  2. 在 VSCode 中,開啟 Heroku 專案
  3. 使用「Command Palette...」,輸入「Heroku: Link the current workspace to an existing Heroku app」,自動找尋 Heroku 專案設定檔,連結 Heroku 專案!
  4. 在文字介面視窗中,可安裝 line-bot-sdk ,協助本地端執行與除錯工作:pip install line-bot-sdk

參考文獻:

  • 第 09 天:LINE BOT SDK:註冊!註冊!註冊!
  • 2021年7月14日 星期三

    程式的優化與完整性

    學習目標:
    • 將程式流程完整做好,符合商業邏輯需求!
    • 將重複的程式,進行模組化或是利用類別物件去除!

    處理重複的程式!
    1. 將地圖程式,利用函式,去除重複的部份: playMap.py
      import Stores
      class playMap1:
          def __init__(self):
              self.__mapEmpty = " "
              self.__mapWall = "|"
              self.__mapLine = "-"
              self.myStores = Stores.Stores()
      
          def printMap(self,userPo):
              # 新程式區塊
              for k in range(1,28):
                  # 印出第一、二、三行
                  if (( k == 1 ) or (k == 2) or ( k == 3)):
                      self.printmap1(k,0,7,userPo)   
                  # 印出第四行,以及第二十四行
                  if (( k == 4 ) or ( k == 24 )):
                      print(48*self.__mapLine)
                  # 印出第五、六、七行,九、十、十一行,十三、十四、十五行,十七、十八、十九行,二十一、二十二、二十三行    
                  if (( k == 5 ) or (k == 6) or ( k == 7)):
                      self.printmap2(k,23,7,userPo)
                  if (( k == 9 ) or (k == 10) or ( k == 11)):
                      self.printmap2(k,22,8,userPo)
                  if (( k == 13 ) or (k == 14) or ( k == 15)):
                      self.printmap2(k,21,9,userPo)
                  if (( k == 17 ) or (k == 18) or ( k == 19)):
                      self.printmap2(k,20,10,userPo)
                  if (( k == 21 ) or (k == 22) or ( k == 23)):
                      self.printmap2(k,19,11,userPo)        
                  # 印出第八、十二、十六、二十行
                  if (( k == 8 ) or (k == 12) or ( k == 16) or ( k == 20)):
                      print(7*self.__mapLine + 34*self.__mapEmpty + 7*self.__mapLine)
                  # 印出第二十五、二十六、二十七行    
                  if (( k == 25 ) or (k == 26) or ( k == 27)):
                      self.printmap1(k,18,11,userPo)
                  
      
          # 列印地圖程式
          def printmap1(self,k,min,max,userPo):
              if (max-min) > 0 :
                  j = 1
              else:
                  j = -1
              if ((k == 1) or (k == 25)):
                  for i in range(min,max,j):
                      if (self.myStores.getStoreData(str(i))[2] == "-1"):
                          owner = " "
                      else:
                          owner = self.transferNo(self.myStores.getStoreData(str(i))[2])
                      print(self.__mapEmpty + self.getStoreName(self.myStores.getStoreData(str(i))[1]) + owner,end = '')
                      if ((i < 6) or (i > 12)):
                          print(self.__mapWall,end = '')
                      else:
                          print()
      
              elif (( k == 2) or (k == 26)):
                  for i in range(min,max,j):
                      print(self.__mapEmpty + self.getStoreName(self.transferNo(self.myStores.getStoreData(str(i))[3])) + self.__mapEmpty,end = '')
                      if ((i < 6) or (i > 12)):
                          print(self.__mapWall,end='')
                      else:
                          print()
      
              elif (( k == 3) or (k == 27)):
                  po_tmp = ""
                  for i in range(min,max,j):
                      po_tmp = self.__mapEmpty
                      for l in range(len(userPo)):
                          if (userPo[l] == str(i)):
                              po_tmp = po_tmp + self.transferNo(str(l+1))
                          else:
                              po_tmp = po_tmp + self.__mapEmpty
      
                      # 若人數不足四人則補足其它空間
                      if (len(userPo) < 4):
                          po_tmp = po_tmp + (4-len(userPo))*self.__mapEmpty
      
                      po_tmp = po_tmp + self.__mapEmpty
                      if ((i < 6) or (i > 12)):
                          print(po_tmp + self.__mapWall,end = '')
                      else:
                          print(po_tmp,end = '')
                  print()
      
          def printmap2(self,k,min,max,userPo):
              for i in (min,max):
                      if (self.myStores.getStoreData(str(i))[2] == "-1"):
                          owner = " "
                      else:
                          owner = self.transferNo(self.myStores.getStoreData(str(i))[2])
              if (( k == 5) or ( k == 9) or( k == 13) or( k == 17) or( k == 21)):
                  lines = ""
                  lines = lines + self.__mapEmpty + self.getStoreName(self.myStores.getStoreData(str(min))[1]) + owner + self.__mapWall
                  lines = lines + 34*self.__mapEmpty
                  lines = lines + self.__mapWall + self.__mapEmpty + self.getStoreName(self.myStores.getStoreData(str(max))[1]) + owner
                  print(lines)
      
              elif (( k == 6) or ( k == 10) or( k == 14) or( k == 18) or( k == 22)):
                  lines = ""
                  lines = lines + self.__mapEmpty + self.getStoreName(self.transferNo(self.myStores.getStoreData(str(min))[3])) + owner + self.__mapWall
                  lines = lines + 34*self.__mapEmpty
                  lines = lines + self.__mapWall + self.__mapEmpty + self.getStoreName(self.transferNo(self.myStores.getStoreData(str(max))[3])) + owner
                  print(lines)
      
              elif (( k == 7) or ( k == 11) or( k == 15) or( k == 19) or( k == 23)):
                  po_tmp = ""
                  lines = self.__mapEmpty
                  for j in range(len(userPo)):
                      if (userPo[j] == str(str(min))):
                          po_tmp = po_tmp + self.transferNo(str(j+1))
                      else:
                          po_tmp = po_tmp + self.__mapEmpty
                  # 若人數不足四人則補足其它空間
                  if (len(userPo) < 4):
                      po_tmp = po_tmp + (4-len(userPo))*self.__mapEmpty
                  po_tmp = po_tmp + self.__mapEmpty
                  lines = lines + po_tmp + self.__mapWall
                  po_tmp = ""
                  lines = lines + 34*self.__mapEmpty
                  for j in range(len(userPo)):
                      if (userPo[j] == str(str(max))):
                          po_tmp = po_tmp + self.transferNo(str(j+1))
                      else:
                          po_tmp = po_tmp + self.__mapEmpty
                  po_tmp = po_tmp + self.__mapEmpty
                  lines =  lines + self.__mapWall + self.__mapEmpty + po_tmp
                  print(lines)
      
          # 控制每一行的格式大小
          def getStoreName(self,data):
              storeName = ""
              if (len(data) <= 4):
                  storeName = data + (4-len(data))*" "
              return storeName
      
          # 半形全形轉換功能
          def transferNo(self,data):
              nums = (0,"0",1,"1",2,"2",3,"3",4,"4",5,"5",6,"6",7,"7",8,"8",9,"9")
              tmp = []
              dataleng = len(data)
              for j in range(0,dataleng):
                  tmp.append(0)
      
              newdata = ""
              for i in range(1,dataleng+1):
                  tmp[(dataleng-i)] = int(data)%10
                  data = int(int(data) / 10)
      
              for i in range(0,len(tmp)):
                  newdata += nums[nums.index(tmp[i])+1]
      
              return newdata
      
      if __name__ == "__main__":
          myMap = playMap1()
          userPo = ['11']
          myMap.printMap(userPo)
      
    2. 修改 main.py 程式,將玩家資訊,導入 Player.py:
      (前方略過....)
      ## 清除舊資料
      def clearOldData():
          files = open('players.csv','w',encoding='utf-8')
          files.truncate()
          files.close()
      (中間略過...)
        # 逐次產生玩家名稱、玩家代號、玩家初始遊戲幣、玩家初始位置等物件內容
          clearOldData()
          for i in range(players_num):
              players.append(Player.Player())
              # 要求玩家輸入玩家名稱
              players[i].setName(input("請輸入玩家名稱:"),i)
      
    3. 修改玩家程式 Player.py ,將資訊寫入 players.csv ,並且設置可讀出方式:
      (前方略過...)
      # 初始化玩家,每人發 20000 遊戲幣以及出發位置為 0
          def __init__(self,money = 20000, po = 0):
              self.__money = money
              self.__po = po
              self.__status = 0
      
          # 設定玩家名稱
          def setName(self,name,id):
              self.__name = name
              self.__id = id
              with open('players.csv','a',newline='') as csvfile:
                  writer = csv.writer(csvfile, delimiter=',')
                  writer.writerow([self.__id,self.__name,self.__money,self.__po,self.__status])
      (以下略過....)
      
    4. 編寫訊息程式,將訊息導入文字檔,再由地圖檔輸出:Messages.py
      class Messages:
          
          def inputData(self,messages):
              self.__messages = messages
              # 開啟檔案,設定成可寫入模式
              new_files = open("messages.txt","w", encoding='utf-8')
      
              # 將串列寫入檔案中
              new_files.writelines(messages)
      
              # 關閉檔案
              new_files.close()
          
          def outputData(self):
              files = open("messages.txt","r", encoding='utf-8')
              messages = []
              messages = files.readlines()
              self.__messages = messages[0]
              return self.__messages
      
      if __name__ == "__main__":
          news = Messages()
          news.inputData("測試用")
          print(news.outputData())
      
    5. 將主要流程的程式,功能完備!
      # 引用 random 類別中的 randrange() 函數
      from random import randrange
      
      # 引用 Player 物件
      import Player
      
      # 引用 Chance 物件
      import Chance
      import Destiny
      # 引用 Stores 物件
      import Stores
      
      # 引用 playMap 物件
      import playMap
      
      import Messages
      
      # 常用函式、參數設定區域
      ## 遊戲方格總數
      areas = 24
      
      ## 處理玩家是否有經過「開始」
      def playerPo(steps):
          if (steps >= areas):
              nums = (steps % areas)
              return nums
          else:
              return steps
      
      ## 清除舊資料
      def clearOldData():
          files = open('players.csv','w',encoding='utf-8')
          files.truncate()
          titles = "id,name,money,po,status\n"
          files.writelines(titles)
          files.close()
          files = open('messages.txt','w',encoding='utf-8')
          files.truncate()
          titles = "遊戲即將開始...."
          files.writelines(titles)
          files.close()
      
      # 程式流程開始
      # 使用 if __name__
      if __name__ == "__main__":
      
          # 要求玩家要輸入遊戲人數
          players_num = eval(input("請輸入玩家人數:"))
      
          # 建立玩家物件
          players = []
      
          # 按照遊戲人數,使用 Player 類別
          # 逐次產生玩家名稱、玩家代號、玩家初始遊戲幣、玩家初始位置等物件內容
          clearOldData()
          for i in range(players_num):
              players.append(Player.Player())
              # 要求玩家輸入玩家名稱
              players[i].setName(input("請輸入玩家名稱:"),i)
              
          # 設定玩家位置值
          players_po = []
          for i in range(players_num):
              players_po.append('0')
          
          # 設定玩家順序值
          i = 0
          myMap = playMap.playMap()
          
          # 設定訊息存放物件
          news = Messages.Messages()
          news.inputData("請按下《ENTER》進行遊戲")
          myMap.printMap(players_po)
          input()
          # 開始進行遊戲
          while True:    
          ##### a.) 印出地圖
              news.inputData(myMap.transferNo(str(i+1)) + "號玩家按下《ENTER》進行遊戲")
              myMap.printMap(players_po)
              input()
          ##### b.) 擲骰子
              oldpo = players[i].getPo()
              newstep = randrange(1,6)
              news.inputData(myMap.transferNo(str(i+1)) + "號玩家擲骰子:" + myMap.transferNo(str(newstep)) + "點")
              myMap.printMap(players_po) # 印地圖
              # 設定玩家新的位置
              players[i].setPo(newstep)
          ##### c.) 移動到骰子點數的框格
              newpo = players[i].getPo()
              
              # I. 可能經過起點
              if ((int(newpo/areas) > int(oldpo/areas)) and ((newpo % areas) != 0)):
                  news.inputData(myMap.transferNo(str(i+1)) + "號玩家越過「開始」位置《ENTER》")
                  players[i].setMoney(2000,i)
                  myMap.printMap(players_po)
                  input()
                  news.inputData(myMap.transferNo(str(i+1)) + "號玩家得2000《ENTER》")
      
              newpo = playerPo(newpo)
              players_po[i] = str(newpo)
              myMap.printMap(players_po)
              input()
              news.inputData(myMap.transferNo(str(i+1)) + "號玩家在新位置:" + myMap.transferNo(str(newpo)) + "《ENTER》")
              myMap.printMap(players_po)
              input()
              #  II. 可能落在邊角框格
              if (newpo == 0):
                  news.inputData(myMap.transferNo(str(i+1)) + "號玩家回到「開始」位置《ENTER》")
                  myMap.printMap(players_po)
                  input()
              elif (newpo  == 6):
                  #print(" 休息一天")
                  news.inputData(myMap.transferNo(str(i+1)) + "號玩家,無事休息一天《ENTER》")
                  myMap.printMap(players_po)
                  input()
              elif (newpo  == 18):
                  #print(" 再玩一次")
                  news.inputData(myMap.transferNo(str(i+1)) + "號玩家,再玩一次《ENTER》")
                  myMap.printMap(players_po)
                  input()
                  continue
              elif (newpo == 12):
                  news.inputData(myMap.transferNo(str(i+1)) + "號玩家,休息三次《ENTER》")
                  myMap.printMap(players_po)
                  input()
              #  III. 可能是在機會與命運框格
              ## 機會的地圖編號是 3,15 兩個號碼
              elif ((newpo == 3) or (newpo == 15)):
                  myChance = Chance.Chance()
                  chances = myChance.choice()
                  players[i].setMoney(int(chances[1]),i)
                  news.inputData(myMap.transferNo(str(i+1)) + "號玩家中機會:" + chances[0])
                  myMap.printMap(players_po)
                  input()
              ## 命運的地圖編號是 9,21 兩個號碼    
              elif ((newpo == 9) or (newpo == 21)):
                  myDestiny = Destiny.Destiny()
                  destines = myDestiny.choice()
                  players[i].setMoney(int(destines[1]),i)
                  news.inputData(myMap.transferNo(str(i+1)) + "號玩家中命運:" + destines[0])
                  myMap.printMap(players_po)
                  input()
      
              #  IV. 可能是在地產框格
              else:
                  playerStore = Stores.Stores()
                  store = playerStore.getStoreData(str(newpo))
                  ## 判斷是否有人己取得該地產所有權了
                  if store[2] == '-1':
                      #print("該地產無人所有!")
                      news.inputData("該地產無人所有!是否買進?(Y|N)")
                      myMap.printMap(players_po)
                      results = input()
                      if ((results == 'Y') or (results == 'y')):
                          store[2] = str(i+1)
                          playerStore.setStoreData(store)
                          players[i].setMoney(0-int(store[3]),i)
                          news.inputData(myMap.transferNo(str(i+1)) + "號玩家買進地產:" + store[1])
                          myMap.printMap(players_po)
                          input()
                      else:
                          news.inputData(myMap.transferNo(str(i+1)) + "號玩家放棄買進")
                          myMap.printMap(players_po)
                          input()
                  else:
                      print("該地產為:" + str(players[int(store[2])-1].getName()) + "所有")
                  playerStore = None
          ##### e.)
              # 輪至下一位玩家
              i = i + 1
              if (i >= players_num):
                  i = i - players_num
              
          ##### f.) 結束遊戲條件
              ends = input("是否結束遊戲?Y:是 N:繼續")
              if ((ends == "Y") or (ends == "y")):
                  break
      
    6. 持續修正至完成為止!

    2021年7月11日 星期日

    文字介面地圖的繪製

    學習目標:
    • 了解 Python 如何處理文字介面下的地圖列印方式!

    處理過程實作
    1. 請先思考一個平面上,二維圖形的排列方式:           


      PS:
      • 使用全形字來表示一個佔有空間,連空白也是!
      • 第一行為地產名稱,名稱最右方,放置地產所有者的代號
      • 第二行放置地產的價值
      • 第三行放置剛好路過的玩家代號
      • 計算的結果,就是48個格式X27行的全形字地圖大小
    2. 試著寫個程式,印出第一行 playMap.py:
      import Stores
      
      class playMap:
      
          def printMap(self):
              mapEmpty = " "
              mapWall = "|"
              myStores = Stores.Stores()
              # 印出第一行
              for i in range(0,7):
                  print(mapEmpty + self.getStoreName(myStores.getStoreData(str(i))[1]),end = '')
                  if (i < 6):
                      print(mapWall,end='')
                  else:
                      print()
      
          # 控制每一行的格式大小
          def getStoreName(self,data):
              storeName = ""
              if (len(data) <= 4):
                  storeName = data + (4-len(data))*" "
              return storeName
      if __name__ == "__main__":
          myMap = playMap()
          myMap.printMap()
      
    3. 持續修改,將第二行的部份,數字轉成全形,列印出來:
      import Stores
      
      class playMap:
      
          def printMap(self):
              mapEmpty = " "
              mapWall = "|"
              myStores = Stores.Stores()
              # 印出第一行
              for i in range(0,7):
                  if (myStores.getStoreData(str(i))[2] == "-1"):
                      owner = " "
                  else:
                      owner = self.transferNo(myStores.getStoreData(str(i))[2])
      
                  print(mapEmpty + self.getStoreName(myStores.getStoreData(str(i))[1]) + owner,end = '')
                  if (i < 6):
                      print(mapWall,end='')
                  else:
                      print()
              # 印出第二行
              for i in range(0,7):
                  print(mapEmpty + self.getStoreName(self.transferNo(myStores.getStoreData(str(i))[3])) + mapEmpty,end = '')
                  if (i < 6):
                      print(mapWall,end='')
                  else:
                      print()        
      
          # 控制每一行的格式大小
          def getStoreName(self,data):
              storeName = ""
              if (len(data) <= 4):
                  storeName = data + (4-len(data))*" "
              return storeName
      
          # 半形全形轉換功能
          def transferNo(self,data):
              nums = (0,"0",1,"1",2,"2",3,"3",4,"4",5,"5",6,"6",7,"7",8,"8",9,"9")
              tmp = []
              dataleng = len(data)
              for j in range(0,dataleng):
                  tmp.append(0)
      
              newdata = ""
              for i in range(1,dataleng+1):
                  tmp[(dataleng-i)] = int(data)%10
                  data = int(int(data) / 10)
      
              for i in range(0,len(tmp)):
                  newdata += nums[nums.index(tmp[i])+1]
      
              return newdata
      
      if __name__ == "__main__":
          myMap = playMap()
          myMap.printMap()
      
    4. 印出第三行,請考慮清楚每位玩家的位置:
      import Stores
      
      class playMap:
      
          def printMap(self,userPo):
              mapEmpty = " "
              mapWall = "|"
              myStores = Stores.Stores()
              # 印出第一行
              for i in range(0,7):
                  if (myStores.getStoreData(str(i))[2] == "-1"):
                      owner = " "
                  else:
                      owner = self.transferNo(myStores.getStoreData(str(i))[2])
      
                  print(mapEmpty + self.getStoreName(myStores.getStoreData(str(i))[1]) + owner,end = '')
                  if (i < 6):
                      print(mapWall,end='')
                  else:
                      print()
              # 印出第二行
              for i in range(0,7):
                  print(mapEmpty + self.getStoreName(self.transferNo(myStores.getStoreData(str(i))[3])) + mapEmpty,end = '')
                  if (i < 6):
                      print(mapWall,end='')
                  else:
                      print()
      
              # 印出第三行
              po_tmp = ""
              for i in range(0,7):
                  po_tmp = mapEmpty
                  for j in range(len(userPo)):
                      if (userPo[j] == str(i)):
                          po_tmp = po_tmp + self.transferNo(str(j+1))
                      else:
                          po_tmp = po_tmp + mapEmpty
                  po_tmp = po_tmp + mapEmpty
                  if (i < 6):
                     print(po_tmp + mapWall,end = '')
                  else:
                     print(po_tmp,end = '')
              print()
      
          # 控制每一行的格式大小
          def getStoreName(self,data):
              storeName = ""
              if (len(data) <= 4):
                  storeName = data + (4-len(data))*" "
              return storeName
      
          # 半形全形轉換功能
          def transferNo(self,data):
              nums = (0,"0",1,"1",2,"2",3,"3",4,"4",5,"5",6,"6",7,"7",8,"8",9,"9")
              tmp = []
              dataleng = len(data)
              for j in range(0,dataleng):
                  tmp.append(0)
      
              newdata = ""
              for i in range(1,dataleng+1):
                  tmp[(dataleng-i)] = int(data)%10
                  data = int(int(data) / 10)
      
              for i in range(0,len(tmp)):
                  newdata += nums[nums.index(tmp[i])+1]
      
              return newdata
      
      if __name__ == "__main__":
          myMap = playMap()
          userPo = ['6','3','4','1']
          myMap.printMap(userPo)
      
    5. 再印出4~7行:
      import Stores
      
      class playMap:
      
          def printMap(self,userPo):
              mapEmpty = " "
              mapWall = "|"
              mapLine = "-"
              myStores = Stores.Stores()
              # 印出第一行
              for i in range(0,7):
                  if (myStores.getStoreData(str(i))[2] == "-1"):
                      owner = " "
                  else:
                      owner = self.transferNo(myStores.getStoreData(str(i))[2])
      
                  print(mapEmpty + self.getStoreName(myStores.getStoreData(str(i))[1]) + owner,end = '')
                  if (i < 6):
                      print(mapWall,end='')
                  else:
                      print()
              # 印出第二行
              for i in range(0,7):
                  print(mapEmpty + self.getStoreName(self.transferNo(myStores.getStoreData(str(i))[3])) + mapEmpty,end = '')
                  if (i < 6):
                      print(mapWall,end='')
                  else:
                      print()
      
              # 印出第三行
              po_tmp = ""
              for i in range(0,7):
                  po_tmp = mapEmpty
                  for j in range(len(userPo)):
                      if (userPo[j] == str(i)):
                          po_tmp = po_tmp + self.transferNo(str(j+1))
                      else:
                          po_tmp = po_tmp + mapEmpty
                  po_tmp = po_tmp + mapEmpty
                  if (i < 6):
                     print(po_tmp + mapWall,end = '')
                  else:
                     print(po_tmp,end = '')
              print()
      
              # 印出第四行
              print(48*mapLine)
      
              # 印出第五行,修改自第一行
              for i in (23,7):
                  if (myStores.getStoreData(str(i))[2] == "-1"):
                      owner = " "
                  else:
                      owner = self.transferNo(myStores.getStoreData(str(i))[2])
              lines = ""
              lines = lines + mapEmpty + self.getStoreName(myStores.getStoreData(str(23))[1]) + owner + mapWall
              lines = lines + 34*mapEmpty
              lines = lines + mapWall + mapEmpty + self.getStoreName(myStores.getStoreData(str(7))[1]) + owner
              print(lines)
              
              # 印出第六行,修改自第五行
              lines = ""
              lines = lines + mapEmpty + self.getStoreName(self.transferNo(myStores.getStoreData(str(23))[3])) + owner + mapWall
              lines = lines + 34*mapEmpty
              lines = lines + mapWall + mapEmpty + self.getStoreName(self.transferNo(myStores.getStoreData(str(7))[3])) + owner
              print(lines)
      
              # 印出第七行,修改自第三行
              po_tmp = ""
              lines = mapEmpty
              for j in range(len(userPo)):
                  if (userPo[j] == str(str(23))):
                      po_tmp = po_tmp + self.transferNo(str(j+1))
                  else:
                      po_tmp = po_tmp + mapEmpty
              po_tmp = po_tmp + mapEmpty
              lines = lines + po_tmp + mapWall
              po_tmp = ""
              lines = lines + 34*mapEmpty
              for j in range(len(userPo)):
                  if (userPo[j] == str(str(7))):
                      po_tmp = po_tmp + self.transferNo(str(j+1))
                  else:
                      po_tmp = po_tmp + mapEmpty
              po_tmp = po_tmp + mapEmpty
              lines =  lines + mapWall + po_tmp
              print(lines)
      
          # 控制每一行的格式大小
          def getStoreName(self,data):
              storeName = ""
              if (len(data) <= 4):
                  storeName = data + (4-len(data))*" "
              return storeName
      
          # 半形全形轉換功能
          def transferNo(self,data):
              nums = (0,"0",1,"1",2,"2",3,"3",4,"4",5,"5",6,"6",7,"7",8,"8",9,"9")
              tmp = []
              dataleng = len(data)
              for j in range(0,dataleng):
                  tmp.append(0)
      
              newdata = ""
              for i in range(1,dataleng+1):
                  tmp[(dataleng-i)] = int(data)%10
                  data = int(int(data) / 10)
      
              for i in range(0,len(tmp)):
                  newdata += nums[nums.index(tmp[i])+1]
      
              return newdata
      
      if __name__ == "__main__":
          myMap = playMap()
          userPo = ['6','23','7','1']
          myMap.printMap(userPo)
      
    處理主要流程程式,導入地圖程式:
    1. 將上述程完成後,加入主要程式流程 main.py:
      # 引用 random 類別中的 randrange() 函數
      from random import randrange
      
      # 引用 Player 物件
      import Player
      
      # 引用 Chance 物件
      import Chance
      
      # 引用 Stores 物件
      import Stores
      
      # 引用 playMap 物件
      import playMap
      
      # 常用函式、參數設定區域
      ## 遊戲方格總數
      areas = 24
      
      ## 處理玩家是否有經過「開始」
      def playerPo(steps):
          if (steps >= areas):
              return (steps % areas)
          else:
              return steps
      
      # 程式流程開始
      # 使用 if __name__
      if __name__ == "__main__":
      
          # 要求玩家要輸入遊戲人數
          players_num = eval(input("請輸入玩家人數:"))
      
          # 建立玩家物件
          players = []
      
          # 按照遊戲人數,使用 Player 類別
          # 逐次產生玩家名稱、玩家代號、玩家初始遊戲幣、玩家初始位置等物件內容
          for i in range(players_num):
              players.append(Player.Player())
              # 要求玩家輸入玩家名稱
              players[i].setName(input("請輸入玩家名稱:"))
              
          # 輸出資料
          for i in range(players_num):
              print(players[i].getName())
              print(players[i].getPo())
              print(players[i].getMoney())
              
          # 設定玩家順序值
          i = 0
          myMap = playMap.playMap()
          players_po = ['0','0','0','0']
          
          # 開始進行遊戲
          while True:    
          ##### a.) 印出地圖
              myMap.printMap(players_po)
          ##### b.) 擲骰子
              input("按下 Enter 進行遊戲.....")
              newstep = randrange(1,6)
              print(players[i].getName() + "擲骰子:" + str(newstep) + " 點")
              print(players[i].getName() + "前進中...")
              # 設定玩家新的位置
              players[i].setPo(newstep)
              
          ##### c.) 移動到骰子點數的框格
              newpo = players[i].getPo() 
              # I. 可能經過起點
              if newpo >= areas:
                  newpo = playerPo(newpo)
                  if newpo == 0:
                      print("玩家回到「開始」位置:", newpo)
                  elif newpo < (areas/4):
                      print("玩家越過「開始」位置:", newpo)
              players_po[i] = str(newpo)
              myMap.printMap(players_po)
              print("玩家在新位置:",newpo)
              #  II. 可能落在邊角框格
              if (newpo  == 6):
                  print("玩家休息一天")
              elif (newpo  == 18):
                  print("玩家再玩一次")
      
              #  III. 可能是在機會與命運框格
              ## 機會的地圖編號是 3,15 兩個號碼
              elif ((newpo == 3) or (newpo == 15)):
                  myChance = Chance.Chance()
                  chances = myChance.choice()    
                  print("玩家中機會:",chances[0])
      
              #  IV. 可能是在地產框格
              else:
                  playerStore = Stores.Stores()
                  store = playerStore.getStoreData(str(newpo))
                  ## 判斷是否有人己取得該地產所有權了
                  if store[2] == '-1':
                      print("該地產無人所有!")
                  else:
                      print("該地產為:" + str(players[int(store[2])].getName()) + "所有")
                 
          ##### e.)
              # 輪至下一位玩家
              i = i + 1
              if (i >= players_num):
                  i = i - players_num
              
          ##### f.) 結束遊戲條件
              ends = input("是否結束遊戲?Y:是 N:繼續")
              if ((ends == "Y") or (ends == "y")):
                  break
      

    2021年7月10日 星期六

    處理CSV檔案內容更新問題

    學習目標:
    • 了解 Python 如何更新 CSV 檔案內容!

    處理過程實作
    1. 先準備好需要更新的 CSV 檔案, stores.csv
      ID,name,owner,prize
      1,日本,-1,2500
      7,加拿大,-1,3500
      13,英國,-1,4500
      19,埃及,-1,1200
      2,南韓,-1,2000
      8,美國,-1,4300
      14,法國,-1,4200
      20,象牙海岸,-1,2200
      4,台灣,-1,2500
      10,巴拿馬,-1,3500
      16,德國,-1,3800
      22,南非,-1,1800
      5,新加坡,-1,3000
      11,阿根廷,-1,2800
      17,立陶宛,-1,1700
      23,印度,-1,1800
      
    2. 撰寫一個 Stores.py 的類別程式,可讀取 stores.csv 檔案:
      import csv
      
      class Stores:
      
          def __init__(self):
              self.__id = []
              self.__name = []
              self.__owner = []
              self.__prize = []
              with open('stores.csv', newline='',encoding='utf-8') as csvfile:
                  rows = csv.DictReader(csvfile)
                  for row in rows:
                      self.__id.append(row['ID'])
                      self.__name.append(row['name'])
                      self.__owner.append(row['owner'])
                      self.__prize.append(row['prize'])
      
          def getStoreData(self,po):
              index = self.__id.index(po)
              print(self.__name[index])
      
      if __name__ == "__main__":
          myStore = Stores()
          myStore.getStoreData(str(2))
      
    3. 修改 Stores.py ,將更新後的資料,可以寫入原讀取的資料行:
      (前方略過....)
          def setStoreData(self,newdata):
              index = self.__id.index(newdata[0])
              self.__owner[index] = newdata[2]
              with open('stores.csv', 'w', newline='') as csvfile:
                  writer = csv.writer(csvfile)
                  length = len(self.__id)
                  writer.writerow(['ID','name','owner','prize'])
                  for i in range(0,length):
                      writer.writerow([self.__id[i],self.__name[i],self.__owner[i],self.__prize[i]])
      
      if __name__ == "__main__":
          myStore = Stores()
          result = myStore.getStoreData(str(2))
          result[2] = '1'
          myStore.setStoreData(result)
          newresult = myStore.getStoreData(str(2))
          print(newresult)
      
    修改遊戲主要流程
    1. 加入 Stores 類別,修改遊戲主要流程:
      # 加入 Stores 類別
      import Stores
      (中間一堆程式碼,略過!)
      ##### c.) 移動到骰子點數的框格
              newpo = players[i].getPo()
              
              # I. 可能經過起點
              if newpo >= areas:
                  newpo = playerPo(newpo)
                  if newpo == 0:
                      print("玩家回到「開始」位置:", newpo)
                  elif newpo < (areas/4):
                      print("玩家越過「開始」位置:", newpo)
      
              print("玩家在新位置:",newpo)
              #  II. 可能落在邊角框格
              if (newpo  == 6):
                  print("玩家休息一天")
              elif (newpo  == 18):
                  print("玩家再玩一次")
      
              #  III. 可能是在機會與命運框格
              ## 機會的地圖編號是 3,15 兩個號碼
              elif ((newpo == 3) or (newpo == 15)):
                  myChance = Chance.Chance()
                  chances = myChance.choice()    
                  print("玩家中機會:",chances[0])
      
              #  IV. 可能是在地產框格
              else:
                  playerStore = Stores.Stores()
                  store = playerStore.getStoreData(str(newpo))
                  ## 判斷是否有人己取得該地產所有權了
                  if store[2] == '-1':
                      print("該地產無人所有!")
                  else:
                      print("該地產為:" + str(players[store[2]].getName()) + "所有")
      (剩下的程式碼略過....)